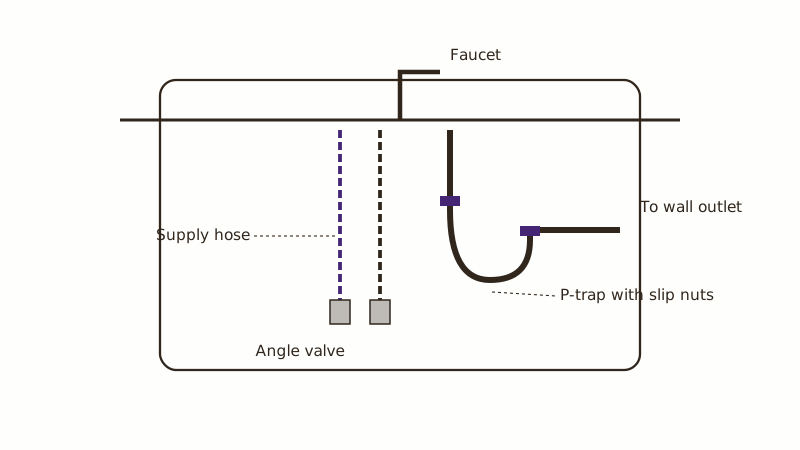
Dry the cabinet floor before anything else. Then slide fresh paper towel beneath each pipe and watch which one darkens first; that tells you whether the faucet supply, the drain trap or the disposal is the culprit. This guide goes in that order, and for a disposal that leaks or jams, see our garbage disposal and sink repair page, which covers what a plumber does.
What is the safe first move?
Find the small angle valve at the wall and twist it clockwise to its stop. Slide a bucket underneath. Where a disposal sits in the cabinet, flip its wall switch off and unplug it, or cut its breaker, before fingers go anywhere near the blades.
Lacking a valve, or facing one stuck fast, close the house main near the meter instead. Forcing a stubborn handle can snap the stem. Mop the cabinet floor completely; a wet base swells and grows mold when water pools.
Which pipe is actually wet?
Turn the faucet on and run a dry towel over each joint from top to bottom. Wetness that shows only with the faucet running implicates the supply hoses or the spout's base. Wetness that shows when the basin empties implicates the trap, tailpiece or disposal connection, since only those carry drain water.
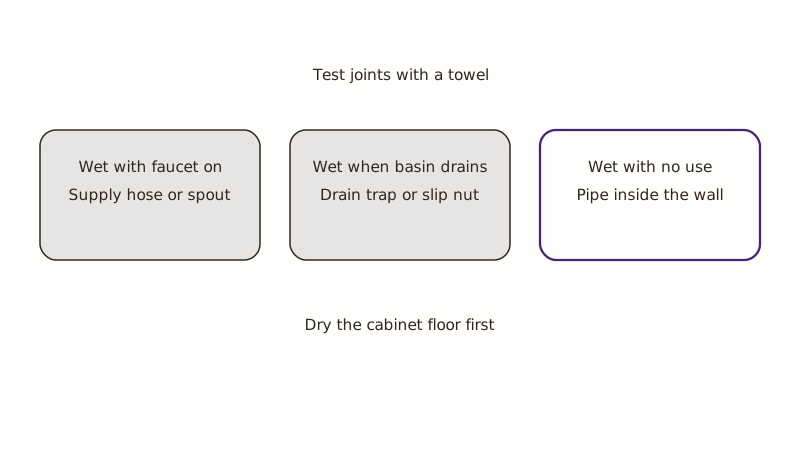
Fill the basin, then let it go to test the drain side. A drip around a flexible supply hose, or where it meets the shutoff, means a failed washer or a worn hose. Water tracking down the outside of a pipe may start higher, so climb to the highest wet spot before deciding.
Drain trap or slip nut dripping: now what?
Tighten first. That curved section below the basin is a P-trap, held by two slip nuts. Snug each by hand, then add a quarter turn of pliers and stop there, because plastic cracks. If it still weeps, undo both nuts, check that the rubber washer sits flat and has not split, and reassemble.
Hardened washers and cracked traps need replacing, and both parts are cheap. Set a bucket beneath before opening the trap, since water and food scraps will spill. Carry the old piece to a plumbing aisle to match diameter. A metal trap corroded through is usually swapped for plastic.
Can I swap a weeping supply hose myself?
Close the angle valve, open the faucet to empty the line, then unscrew the flexible hose at each end. Fit a replacement of matching length and thread size; braided stainless hoses are common and cost little. Tighten by hand, then add a quarter turn at each nut; further than that ruins the washer.
Drips around the spout or handle come from the faucet, usually a worn O-ring or cartridge. Our guides cover fixing a leaky faucet and a leaking shower faucet. Replacing the shutoff valve itself is plumbing work, and may mean closing the main.
What about threaded metal pipe joints?
Old metal pipe joints leak where threads or fittings corrode. Wrapping new plumber's tape on a clean thread helps a joint that was dry-fitted, but a pipe that has pinholes or a crack along its length needs replacing, not sealing. A clamp or epoxy is only a stopgap.
Rusted pipe buried in a wall is a bigger job. A leak that seems to come from within the wall or floor, a stain on the wall behind the cabinet, or old and rusty pipe all point to a plumber. None of those is a patch-it-yourself repair.
At what point do I stop and call someone?
Call if you cannot isolate the leak, the water refuses to stop, the wall or floor has been damaged, the disposal leaks through its body, or a repair fails twice in a row. Electricity or gas near water means stopping on the spot, and the plumber takes it from there.
A simple under-sink repair normally falls under the state's $1,000 license threshold for labor plus materials, though permit jobs need a contractor license at any size. The Ontario Building counter, (909) 395-2023, can say whether a permit applies. A visit starts with a note on the quote form.
What keeps it from returning?
Check under the sink every few months with a dry towel, since slow drips show up there first. Do not store chemicals or paper goods against the pipes. Replace rubber supply hoses when they look stiff or bulge. Run hot water after heavy use of the disposal.
Hard water leaves crust on fittings, and Ontario's utility reported average hardness between 91 and 177 ppm for 2025, by source. That mineral buildup can hide a slow leak, so wipe the joints and look again. A swollen or stained cabinet floor should be replaced, since damp wood keeps rotting after the leak is repaired. The cause itself is dealt with under softening the supply.
Plenty more plumbing help is reachable from our front page, for repairs beyond the cabinet.
Common questions
What is the time commitment?
A tightened nut or a swapped hose or washer is usually done within the hour. A new trap takes a little longer. Water seeping out of a wall, or a drip that keeps coming back, makes it a bigger job for a plumber.
Can a small drip wait a few weeks?
Better not. EPA figures put the yearly loss from leaks above 9,300 gallons for an average household, and even a slow drip can rot a cabinet and breed mold out of sight. A cheap repair now beats replacing the whole cabinet later, which is a far larger bill.
What do I need in the toolbox?
A bucket, adjustable pliers or a wrench, a flashlight, paper towels and the part itself: washer, supply hose or trap kit. Plumber's tape helps on threaded joints. Match new to old before you pay. Skip caulk as a sealant, since it fails under water pressure.
Who should be in the house?
An adult, so the plumber gets in and sees where the water appears. Empty the sink cabinet first, giving clear access to the pipes. If you cannot be present, a trusted adult may stand in once the price has been settled in writing.